DIY
Maximizing Space: What Changing a Closet Door Can Do
Where to start
When we moved into our house two years ago, the room we had chosen for our teenage daughter had dark walls and a hole where a closet door used to be. From the look of the hole in the wall, one would think the closet was extremely small; however, we discovered the closet ran the length of the wall. Reaching the back of the closet was a challenge with the single existing opening. Maximizing space through adding double doors allowed us to utilize all of our daughter’s closet area.

A starting hole in the wall. Gathering material
In order to maximize the available space we needed to brainstorm ways to expand this space. Adding double doors seemed to meet our needs. Our upstairs has slanted ceilings. The slant of the ceilings impacted the height of standard closet doors. We determined that a height of six feet would allow our daughter to access the top shelf of her closet as well as the rack that holds her clothes.
In order to accommodate the height of the closet doors, we purchased solid wooden doors that could be cut down to the correct size. In addition to the wooden doors, we needed to purchase the appropriate trim for the door. To save on material costs, we shopped for these doors at Southeastern Salvage. When trying to budget for a remodel project, look for local supply stores that are not your typical box store. ReStore is a store created by Habitat for Humanity that carries overstocks or materials leftover from large construction sites. Stores such as Southeastern Salvage or ReStore could save you money. Just remember, you may have to be patient when shopping for your materials.

We used wooden doors for the expansion. Finishing touches
We used the same paint colors we have used throughout the house to finish the doors: White Dove for the interior walls and Simply White for the trim. Both colors are from Benjamin Moore.

I love Purdy paint brushes. (as an Amazon Associate, I am eligible to earn commission on any viable links) Adding double doors to this space allows our daughter to access all the items within her closet. She is able to see what clothing options she has on hand instead of being regulated to half a visual. Maximizing space lends help to organization and decluttering habits as well. Visually, I feel the double doors are a more appealing feature. Let me know in the comments what you think!
You can check out other DIY projects in our current home, here. I would love for you to follow along with us on this home remodel journey.

The finished product Decluttering: Tips for Removing Excess
Any casual viewing of Storage Wars or Hoarders reveals that many of us have an issue with clutter. Decluttering can be an effective way to remove excess from our lives. Removing the excess just may help clear our minds and bring peace. Below are a few of my decluttering tips for removing excess.

A bedroom shows off its beauty when kept clean through decluttering. 1. Designate zones in your house.
A Bowl Full of Lemons really helped me designate specific areas or “zones” of my home. Having listed and designated spaces in your home allows you to tackle one area at a time for decluttering. Sometimes getting rid of all clutter feels overwhelming. Focusing only on one zone feels more manageable.
In addition to decluttering one zone at a time, Go Clean Co. taught me to work an area from left to right. I have 18 zones in my home (front porch, hallways, living room, kid 1 room, kitchen, half bath, commons area, pantry, primary bedroom, primary bathroom, kid 2 room, kid 3 room, dining room, back porch, stairwell, laundry, kids’ bathroom, and garage). As I go through a zone to declutter, I can work in that space from left to right, pulling all items out to see if they are still needed or wanted.
Go Clean Co is an educational follow. 2. Kon Mari it.
If you have never heard of the Kon Mari method, check this article out. I am not gonna lie, for me, tackling the entire Kon Mari method is overwhelming; however, I have taken her advice of touching an item and seeing how your spirit responds as a guide for eliminating clutter. At first, that advice may seem odd but give it a try. When you are decluttering a space, handle each item. Your body has some type of response whether it is negative, meh, or a joyful response. Keep only what sparks joy.
As your pile of decluttered items grows, determine if you will throw them away or donate them. I place my donated items in large bags with handles in order to set them in my car to drop off at my charity of choice.
3. Create a challenge for yourself.
I have created a challenge for myself (I first learned of it from Instagram) on decluttering that I have been working on for six months! The challenge was only supposed to last for one month – ha! For each day of the month, get rid of the corresponding number of items. For example, on day 1, you get rid of 1 item and on day 31, you get rid of 31 items. When you have gone through days 1-31, a total of 497 items will be eliminated from your home. I am currently on day 30 and have 7 of the 30 needed items to throw out. This has definitely been a challenge for me! I thought it would be much easier than it has been but I can tell a big difference in my home when there are close to 500 items of clutter no longer clogging up my home!
For other tips or insight into keeping your home clean, you can read a related previous post here. Have fun decluttering!
5 Daily Habits for Healthy Eating
Eating healthy may seem overwhelming or like an insurmountable tasks; however, establishing healthy eating habits creates positive outcomes in your life. With the implementation of 5 daily habits for healthy eating, you will see an improvement in your overall health.
1. Take a multivitamin.
Multivitamins provide nutrients that your body might be lacking. For me, Vitamin D and C are two vitamins that I need more of in my body. When I take a daily multivitamin, my energy levels noticably improve. Of course, the addition of raw fruits and vegetables will also increase the nutrients available to your body. While the increase in energy levels is wonderful, I will caution against taking any vitamins on an empty stomach. Please eat a full meal before taking vitamins in order to reduce the possibility of nausea and always consult your doctor before taking any new vitamin or supplement.
2. Drink water.
Sure this habit is a no brainer but if you are like me and not a huge fan of water, you might want to get creative in how to get your water intake higher. Setting a goal for how many ounces you will drink per day, using a pretty water bottle, or adding a no sugar sweetener to your water might be ways to make drinking water daily an easy habit. Since reducing sugar in my diet, I find that I am reaching more for water and allowing myself one Coke Zero per day.
There is a drink that Trim Healthy Mama created called “Good Girl Moonshine” and it has water, apple cider vinegar, ground ginger, and stevia in it. I’ve made it with a flavored tea to give it extra punch. This drink is a healthy sipper and also helps with weight loss – the apple cider vinegar can help to invigorate your metabolism.
3. Plan ahead.
This habit is CRUCIAL to my success. Creating a meal plan the weekend before the next week helps me keep on track for healthy eating. Designating specific times to create meals and snacks saves me from becoming too hungry and eating anything in sight. With the proper preparation, I already know what my next meal or snack will be. I have sat down with my own schedule and written in meals and snacks; however, I believe you could use a calendar as well.
Part of my planning includes researching various healthy eating sites via Pinterest and Instagram for meal and snack inspiration. My favorite is when I can find a Trim Healthy Mama weekly meal plan and pull meal ideas from it. In 2022, I set a goal of providing 365 different meals for my family. This task definitely required planning ahead! You can read all about it here.
I recently discovered The Peachie Spoon on Instagram and love the variety of recipes she has that help stabilize blood sugar levels. 4. Eat every 3 hours.
Trim Healthy Mama is the eating plan that I am most closely adhering to and one of its pillars of success is the habit of eating every 3 hours. This time frame allows your body to process the food from the previous meal without overloading its systems.
When I create my meal plan, I write out the times I will be having my meals and snacks. Typically I have a meal at: 6:00 a.m., 9:00 a.m., 12:00 p.m., 3:00 p.m., 6:00 p.m., and 9:00 p.m. My 6:00 a.m., 12:00 p.m., and my 6:00 p.m. times are for meals and the other times are for snacks. The key to success is pairing either fats with protein or carbohydrates with protein but NO MIXING fats, carbs, and protein. I highly recommend the Trim Healthy Mama book. The sisters that wrote the book spent years in research on ways to provide the best nutrition to your body.
As an Amazon Associate, I may be eligible to earn commission on viable links. 5. Celebrate the wins.
Making healthier choices is hard. Celebrating each little win is a great habit to establish daily. Do you feel more energized? That’s a win. Did you lose half a pound? Consider that a win. Are you able to think more clearly? Another win. Celebrate your ability to grow and change for the better. This is a habit to incorporate in every aspect of life!
By implementing these 5 daily habits for healthy eating: take a multivitamin, drink water, plan ahead, eat every 3 hours, and celebrate the wins, you are sure to feel the positive results in your body!
Creating a Summer Schedule
While it is still spring, I like to spend time creating a summer schedule. My kids are 22 (our oldest lives on his own), 17, 15, and 11. Summer schedules have been a lifesaver to me during the summer months. I will share some of my strategies for enjoying the most out of summer break!
1. Add events to your calendar.
Looking at a three month calendar spread and adding all the events your family has in store for the summer will give you peace of mind. Having a visual calendar on display somewhere in your home is also a good idea. For my family, we place all of our events in our iPhone calendar so we can all access the event schedule.

2. Plan ahead.
Before moving to a suburb of Birmingham, the most planning ahead I would have to do would be if there was a sports camp I needed to get on the books. However, moving to a larger city with a larger demographic of two income families, planning ahead for summer is imperative. In our area, some summer camp registrations open in the December before summer break. For example, for summer 2023, some camp registrations opened December 2022. That is quite the planning ahead!

3. Make a list.
Make a list of how many children you have, what sports and activities each child is involved in, what camps and vacations you will be attending this summer. We love heading to the beach for summer vacation. 30A is one of your favorite destinations. You can read about what activities we enjoy at the beach here. Having everything listed out ensures you do not leave any events out when you go to plot them on your calendar.
4. Don’t forget the freebies!
Free events are AMAZING! Reference your local newspaper or happenings page to see what local events are free. A local mom’s group or page is an excellent source of event information. Birmingham Mommy and Rocket City Mom are two amazing sites filled with local events for the Birmingham and Huntsville areas respectively. Two organizations that I have used for years to supply my kiddos with free activities is the church and library. Vacation Bible School and children’s library programs are both FREE! Many volunteers and educators give their time to create remarkable events for our children to enjoy over the summer.
5. Create a weekly and daily schedule.
One of my biggest concerns over the summer months is keeping my kids off of their screens all day. To help with reducing screen time, I create a daily schedule for my kids. For example, each child gets a three ring binder at the beginning of the summer that is his/her Summer Binder. As a family, we decide what activities we enjoy best then create a weekly schedule. Our weekly schedule covers Monday through Friday. Saturdays and Sundays are left alone for weekend time. For example, we have: Make a Meal Monday, Theater Tuesday ($5 movies at AMC theaters), Wet Wednesday (pool day), Thinking Thursday (library day), and Family Friday (another pool day with family and friends – what can we say? We love the pool!) Here is a great example of a summer schedule that I was able to 1 find on Pinterest and utilized to help me craft my own.
Our daily schedule may look like: No more than three hours of screen time, complete responsibilities, play musical instrument, walk the dog, play outside for 30 minutes, read a book, do devotions. Giving a list of possible activities that can be done greatly reduces the “I’m bored!” comments. Factor in our weekly activities and we have a great summer!
Whatever your crew likes to do, my hope is that my tips for creating a summer schedule will benefit you!
Tips for developing your landscape and garden
There are a variety of tips for developing your landscape and garden. Allow me to share a few tips that I incorporate in my landscape and garden.
1. Create a list of what you enjoy.
Taking your environment into consideration, create a list of plants, flowers, trees, and shrubs you enjoy. If planting your garden, what vegetables do you and your family like to eat? When thinking of landscaping, what flowers and shrubs make you smile time and time again? What plants and shrubs match the look of your home?

2. Design a map of your yard.
Designing a map of your yard allows you to craft a layout for where you want your landscape design and garden to reside. Making a map gives you a visual for what space you have available to utilize. For example, drawing out my front yard and backyard gave me a view of what actual areas were available for landscape and/or garden organisms.
We purchased our current home in December of 2021 and it is a total remodel. You can catch up on some of our progress by reading an older post here. In relationship to landscape and gardening, I have determined where I want flower beds and where I want my raised garden beds. Once you have a map design, get to work!
3. Use hardscapes in your landscape.
Hardscapes are a new concept for me. Hardscapes are hard landscape materials that are in the environment structures of the landscape and/or garden. For example, a wooden trellis to hold cucumber vines. I had my husband construct a wooden A-frame structure and will use it in allowing my climbing vegetables a space to move up and down the wooden frame.
Wooden raised bed can be a hardscape. Choosing to connect beds with chicken wire, pvc pipe, metal caging all are examples of hardscaping. Garden decor such as metal design incorporated throughout a garden is hardscaping I believe.
Love the hardscape features that have been designed in this space. 4. Use what you have on hand.
Our current home is old. Our house was built in 1939. I share this because canvasing our small property has produced a wealth of landscaping materials. When we purchased our home, the previous owner left behind a variety of planters and garden decorations. Some items I have culled due to differing taste while others I have kept because I can use them in our flower beds and garden.
Behind our garage, we have found OLD brick which I feel makes the perfect flower bed border. Our backyard contains two gigantic pine trees which produce a large amount of pine straw. I love using pine straw as mulch in flowerbeds.
The previous home owner placed pea gravel throughout the entire backyard. While moving this gravel out of the yard has been a headache, I am making lemons out of lemonade and redistributing this gravel as border to my raised garden beds.
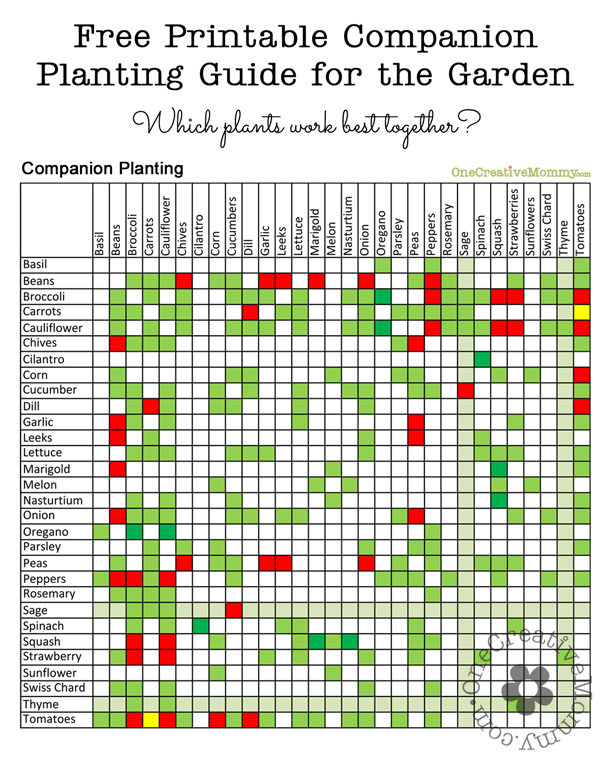
For my garden, I keep whatever seeds I do not use each year in my freezer. Some people say this will not work; however, the only seeds I have had issue with so far are bell pepper seeds. I feel like keeping my bell pepper seeds in the freezer is not the issue. I think I need to prep my bell pepper seeds using a different method. Living in the city provides the perfect opportunity to container garden. Have a planter or container? Plop a squash or zucchinni plant in it. Have just a small raised bed? Google square foot gardening and see how many vegetables you can grow in a small space. Companion planting is a wonderful subject to research. This subject allows you to see what plants grow best near each other.

5. Determine what materials you need to purchase.
Once you have taken inventory of what materials you have on hand, create a list of what you need to purchase. Don’t have any vegetable seeds? Start listing the vegetables you enjoy eating. While I love the idea of a big massive garden, I have to be honest with myself – what am I going to actually eat? What meals do I like to cook using these specific herbs and vegetables. I love seeing herb gardens but if I am honest, I’m not a big fan of mint or dill. Why place items in my garden that I am not going to use? I purchase my seeds either at a local grocery store (herbs) and a local Feed & Seed store (vegetables).
Do you need border material or mulch? Do you need containers? How many plants or shrubs do you need in your space? Make certain that you have a firm understanding of how wide and tall your plants will grow and allow for adequate spacing before you plant. In our flowerbeds we used: Dwarf Holly bushes, Peonies, Gardenias, Rose bushes, and Tea Olive trees. List your big ticket items first and go from there. It is okay to build your garden over time. Creating a successful garden is something that I have been working on for years and I am still learning! This home is the first one in several years that I am taking the time to create a landscape design and garden space I can use and enjoy.
6. Enjoy the journey.
Enjoy the process of creating a lovely landscape design and garden. Life is a progression. You do not have to achieve perfection this side of Heaven. Practice makes skills. Every time I am out in my flowerbeds or garden, I am learning a little more about my home.
Technology is amazing. Researching information via Google or Pinterest or Instagram or YouTube provides a wealth of information that you may use in your outdoor spaces.
I would love to hear from you. I am hopeful that these were helpful tips for your landscape and garden. What tips did you find helpful? Do you have tips that I left out but you feel are important to share? Let me know in the comments and happy gardening!
While I am not at Toni’s level, I absolutely love following along on her garden journey and learning from her. Updating My Daughter’s Room
Remodeling our home feels like what I imagine a marathon would be like – slow and steady but honestly, it’s more like slow and erratic. The latest project is updating my daughter’s room. When we moved in, her room had one small light hanging in the middle of a dark gray room with some pretty cool industrial shelves. We knew we would need to update the space to suit her needs.

This is a shot of Lilly’s room with the paint color on her walls at the time we moved in.
Design Elements
For a year, Lilly and I have discussed what she would like for her bedroom. Our upstairs ceilings are slanted with the slope of the roof. The existing ceiling and wall colors were contrasting and draw the eye to the sharp angles of the slant. Adding one color to these spaces, softens the sharp angles and gives each space an open feel. The elements Lilly requested were: an accent wall and double doors to her closet.
Our paint color of choice for this home is Benjamin Moore’s White Dove. With the warm tones of the hardwood floors, White Dove gives a nice contrast. However, I wanted some type of pop of color for her space.
Boutique Rugs
I have utilized Boutique Rugs in a variety of areas of our home. In fact, sometimes I have changed up the location of a certain rug to multiple rooms based on the home we were living in at the time. What impresses me about Boutique Rugs is the quality for the price. There are over 40,000+ varieties of style, color, and sizing. We wanted a new rug for Lilly’s room and they had just what we needed.
Lilly helped me select a gorgeous 6’7″ x 9′ rug titled Bood Area Rug. While I have purchased multiple rugs from Boutique Rugs, the ability to select this new rug of my choice was gifted to me for product review. The Bood Area Rug has beautiful grays and subtle blues throughout as well as varying pilling sizes which offers a cozy texture to the space.

Here is an after shot of her updated paint color and new rug.
I have yet to be disappointed in a rug that we have from Boutique Rugs. Our living room is host to a beautiful area rug as well as my oldest son’s bedroom showcases another rug from Boutique Rugs. In our last house, I decorated the sun room using the rug that I now use in my son’s bedroom. You can view a picture of it here. I had one more but I am embarrassed to share that I decided it would be a good idea to pressure wash it. I have pressure washed other rugs. Unfortunately this particular rug was a shag rug and pressure washing is a no-no. My lesson has been learned and maybe you too can learn from this cautionary tale!

I love the beautiful grays and subtle blues in the horizontal lines of this rug.
Stay Tuned
If you are in the market for a new area rug, check out Boutique Rugs. The code: HELMSHOUSE will get you 5% off your order. There are still details to finish up in Lilly’s room. She has expressed she wants to try moving her bed to a different wall. Stay tuned for future updates of the completion of updating my daughter’s room and I will share all the design elements we used in this bedroom.
Tips and Tricks when Painting
Experience creates the opportunity for expertise. My experiences with renovating or building homes have made me an expert when it comes to tips and tricks when painting. I want to share what I have learned with you.
Tip #1: Buy quality paint
Quality paint not only means quality of the actual product but also the customer service. For our current home, we have used Benjamin Moore paint. This choice means we must go to the specific Benjamin Moore store in our area. I’m not upset about this considering the customer service we have received during our home renovation. Buying paint from a box store means you are at the mercy of whichever employee may or may not be working in the paint section at that particular time. In my experience, the employees at our local Benjamin Moore store have gone above and beyond to be helpful.
For the majority of our home we selected White Dove for our interior walls and Simply White for our trim. For accent rooms such as the laundry room, we selected Blue Heather. All of our paint colors for our current home are from Benjamin Moore. You can read more about our master bathroom here.
Our master bathroom has White Dove for the wall color and Simply White for the trim color. Tip #2: Buy the right type of paint
When painting ceilings, use a flat paint. For walls use eggshell and for windows, interior doors, and trim use semi-gloss. The types of paint determine the shine and level of difficulty when it comes to clean up. Flat paint is the most difficult to get dirt off of; however, you typically do not need to worry about getting your ceilings dirty. Also, you really do not want your ceiling to shine. For walls, eggshell gives a nice durability and a little shine but very minimal. The window trim, baseboards, crown molding, and interior doors should be in a semi-gloss finish. This finish is a high shine and helps with easy clean up of spills or fingerprints.
For our laundry room, we used Benjamin Moore’s Blue Heather. Tip #3: Buy quality brushes
I will go even farther and say, “buy Purdy paint brushes”. A good quality paint brush such as Purdy will last longer and give a better paint finish. When you factor in longer usage of your brushes then you really are not spending a fortune. They will outlast the cheaper competition. I like to use a slanted, small width Purdy brush for all my cutting in and trim work.
*As an Amazon Associate, I am eligible for commission from any viable link.
Trick #1: Use Shur-Line edgers
For our stairwell, where the borders of our walls met the ceiling, it was a challenge to paint clean lines in those high places. A trick I use is utilizing the Shur-Line edger to get a clean cut by placing the edger on the end of an extendable paint pole.
*As an Amazon Associate, I am eligible for commission from any viable link.
Trick #2: Use aluminum foil and a refrigerator
You may think, what does aluminum foil and a refrigerator have to do with painting? If you will be painting for multiple days and do not want to wash your brush out each time, you may wrap your brush in aluminum foil or a ziplock bag and place it in your refrigerator. This trick will keep your brush from drying out. The important information to remember is to wash your brush out as soon as you are finished painting!
My hope is that you have learned something that you may put to use the next time you are painting in your home!
Kitchen Update
Making a house a home is an ongoing evolution of beauty and function. The kitchen is our latest space to update. To be honest, we are not entirely finished with the space but I just couldn’t wait to share the progress!
Factors to consider when updating your kitchen
In our current home, each space has to be well thought out. We do not have a large footprint for a kitchen. In fact, I would call our kitchen a galley style kitchen. Therefore, when looking to update, I needed to make sure we utilized every square inch. Working with the existing footprint of the home was our biggest factor when creating our kitchen vision.

Initial layout of cabinets. Upper cabinets that extend all the way to the ceiling were a must for this area as well as an entire wall of cabinets on the opposite side of my appliances. The wall of cabinets not only holds dishes and cups but houses our pantry as well. Because the square footage of my kitchen is small, we used upper cabinets stacked on top of one another. Upper cabinets do not have the same depth as standard floor cabinets and this change allowed us to increase our floor space.

Progress shot of our wall of cabinets. Components of our kitchen update
From top to bottom, the components we have utilized in our kitchen update are: Blue Heather and Simply White paint by Benjamin Moore; shaker style cabinets, cabinet handles, and drawer pulls from Cabinets to Go; butcher block (stained by us with Minwax Early American stain) from Southeastern Salvage; porcelain tile titled San Michelle from Floor and Decor; and grout in Alabaster purchased from Floor and Decor.
Many backsplashes that I have seen recently have marble as the material of choice; however, marble is beyond our price point. We went with a 36″ x 36″ porcelain tile.

Our backsplash is 36″x36″ porcelain tile. Progress on our kitchen update
At this time, we have all our cabinets installed, backsplash put up, countertop laid, first coat of wall paint and handles and pulls installed. What we have yet to complete is the second coat of wall paint and the crown molding painted as well as the toe mold installed and painted.
To see what other areas of our home we have updated, you can read here. Let me know what your favorite part is. Do you have a question regarding our selections or the process? I want to hear from you:)
Our current view of our kitchen! Wow with Wallpaper!
When I use to think of how to decorate my home, getting a wow with wallpaper was not in my top ideas. In fact, I am not sure if it would have even made my top 10 decorating ideas. However, it is good to admit when you are wrong and I was wrong.

Rifle Paper Co. Pomegranate wallpaper added to our half bathroom. Inspiration
After viewing beautiful examples of wallpaper displays, I was convinced I needed to incorporate this texture into our home remodel. Being new to this scene, a little bit will go a long way. We incorporated a beautiful Rifle Paper Co. print titled Pomegranate. I selected two areas of the home to showcase this gorgeous print: our half bathroom and our laundry room.
There are a few accounts on Instragram that provide ample inspiration of the traditional usage of wallpaper within the home.
Garden & Grace is such an inspirational account. A local construction company first peeked my interest in this feature with the following beautiful space:
Twin Construction, Inc. delivers taste and style consistently in their projects. Tools
Now to the application! My husband and I knew we would be hanging the wallpaper ourselves so I had to take some YouTube crash courses on how to hang it. DIY projects are not new to us, we have been DIYing our homes our entire married life. You can read about one of our recent projects here.
I viewed the following YouTube video before beginning.
Wallpapering is definitely a two person job. My husband and I tackled our half bathroom first but by the time we transitioned to our laundry room, it became a lot easier to install. The wallpaper seems to be a focal point to draw the eye and make smaller spaces seem larger.

Our Laundry Room For our these projects we used a large framing square to guide cuts, a flat surface to spread wallpaper on and make cuts, a razor edge, paint roller to roll on adhesive, Roman adhesive (shown below *as an Amazon Associate, I may earn commission on viable links), and a plastic straight edge paddle to smooth out any bubbles or creases.
If the idea of hanging wallpaper seems overwhelming, start with peel and stick wallpaper. There is a lot of room for error with peel and stick. I will caution against using pre-pasted wallpaper. I have read of nightmarish experiences using a pre-pasted finish. The glue can become too much to handle. Truly, it does not take much to wow with wallpaper. Let me know if you give it a try!
School Supply Shopping
Are you a spender or a saver? A tightwad or a spendthrift? For me, I find myself wanting to find the best deal on anything I can. To pay full price for anything just about kills me. School supplies is an area that agitates me. I want to get the best deal on items that are needed for the classroom. Waste and excess are two words I do not want to hear when getting ready for going back to school and have me looking for deals when school supply shopping. Planning for the routine and needs of school gets me thinking of other areas of our home that need preparation such as meal planning. A good refresher course for how to meal plan can be found here.
Purchasing Options
To acquire your school items, you have a few options. You may shop for each school supply on your own or order the school supply list from your school. Many schools are now crafting school supply lists then shipping them directly to the homes that have pre-ordered.
The benefit of ordering your school supplies from your local school is you do not have to go out and buy your items on your own time. One potential drawback is the overall cost of supplies tend to be higher on the pre-order list.
The down side of taking the time to shop for your own supplies is you are spending your precious time hunting down the best deals. Another option when searching for your own deals is completing a pick up order from Walmart or Target. You can order what you need then drive by and pick it up without having to go in the store.

Price Comparisons
I have wanted to know for a long time exactly how expensive school supplies are. Typically, I run into whatever store of my choice and throw in school supplies last minute with no knowledge of the cost until checkout.
This year, I did a price comparison between Walmart and Target on school supply prices. I will list the supplies I was shopping for and the price comparisons.
Item Walmart Target 1.5″ Avery Binder $7.64 $7.69 5 tab/poly dividers $3.33 $4.49 Wide Ruled Marble Composition Notebook $.50 $.55 #2 Dixon Ticonderoga Pencils 12 count $6.42 $2.99 Plastic Pocket folders with brads $.50 $.50 Crayola 12 count Erasable Colored Pencils $14.99 $3.99 Fisker 5″ scissors $1.47 $1.49 Elmer’s gluesticks .77 ounce $.52 $1.06 Comparison of prices between Walmart and Target For this week, Target has some great prices and selection so I purchased most of my school supplies from there. I was able to find binders cheaper than the Avery binder pricing. The Target brand binders were $4.69 each. Also, the price for the erasable pencils from Walmart seems just too high but that was the only price I could find online for that particular item. It was just too high compared to the Target price and I am hopeful that I simply made an error in looking up that item.
Ways to Save
Money tight in your household? Frustrated with buying the same supplies each year then getting them back at the end of the school year? Create a space to house all school supplies then at the beginning of each year, shop your stock pile first before you head out to the store. Below is a post from my friend JeriKay about a beautiful piece of furniture she has designated to house all her school supplies.
At times we have reused the plastic, pocketed folders with brads year after year. And with the use of pencil boxes and/or pouches, we have held on to crayons and colored pencils that are barely used. Shopping weekly sales in the days and weeks leading up to a new school year is another way to save money on school supplies.
If holding onto leftover supplies and hunting down the best deals is not worth your time, I totally understand! Do what works best for you and your family. School supply pre-orders may be just the option for you! Whichever you chose, may your school year be filled with peace, learning, and fun!
Let me know in the comments how you shop for school supplies. I would love to hear from you!


